At the University of Wisconsin Hospital and Clinics, head and neck cases are typically treated on our Tomotherapy units. As such, I completed this assignment by creating a Tomo Helical IMRT (THI). I first downloaded the DICOM and structure set for the TG244 Head & Neck plan challenge from ProKnow into MIM to review the volumes, create planning structures, and evaluate the ProKnow scoring metrics I needed to achieve.
After looking through all of the structures, I made my planning structures. First I made the PTV structures that I optimize on (opt_PTV63 and opt_PTV56). These were created by expanding the PTV70 and PTV63 by 3 mm and cropping them out of each other (Figure 1). I did not need to make an optimization structure for PTV70 as nothing needed to be cut out of it. I did this to allow for fall off between the PTV structures and to be able to push on maximum doses of the PTVs more easily. Then, I created a high dose ring (RingHD) by expanding the total of all 3 PTVs by 3 mm and creating a 1.3 cm ring off of the expansion. I then created a 5 cm low dose ring (Normal) off of the RingHD structure (Figure 2). I edited these rings to not extend beyond the external contour. These ring structures were used during optimization to create a conformal and tight plan. I use essentially the same planning structures for all my VMAT and IMRT plans, with only slight variations on the expansions I use. Once I created all my planning structures, I exported the CT and the structures from MIM into the Tomo treatment planning system (TPS).
In the Tomo TPS, under the “ROIs” tab, I designated which structures were targets (PTV70, PTV63, PTV56, opt_PTV63, and opt_PTV56) and ordered the surrounding structures based on their overlap with other structures, as the TPS will not see a structure if it is within another structure that is ordered above it. I proceeded to the “Plan Settings Tab”, where I shifted the patient so the PTVs were more centered and set the plan parameters. The beam energy was 6 MV, as this is the only energy available on Tomo. The delivery mode was set to TomoHelical, the plan mode as IMRT, the field width as 2.512 cm dynamic, and the pitch to 0.215. I then moved on to the “Optimization” tab
The “Optimization” tab is where I put in all my constraints for my target volumes and structures of interest. I kept my dose grid on normal (0.4 cm x 0.4 cm) and I started by designating that at least 95% of all target structures to receive their prescribed dose (for example at least 95% of PTV70 would receive 70 Gy, at least 95% of opt_PTV63 would receive 63 Gy, and so on) and gave them all an importance of 500. I gave an importance of 75 to both of my ring structures (RingHD and Normal) and a maximum dose of 63 Gy and a DVH point of 10% at 56 Gy for the RingHD and a maximum dose of 35 Gy and a DVH point of 5% at 35 Gy for the Normal. I ran about 100 iterations with only constraints on my target structures and ring structures to ensure I was able to achieve desired coverage objectives. Once I was satisfied with the target coverage, I added in the constraints for my surrounding structures. I varied the importance for each structure depending on how much I needed to push to achieve the desired objectives and continued to adjust my dose penalties (weighting) on all targets and structures until I had achieved all of the ProKnow metrics the best I could (Figure 3).
Once satisfied with where my plan was at, I proceeded to the “Fractionation” tab to calculate final dose on a fine dose grid (0.195 cm x 0.195 cm). Once the final calculation was complete, I evaluated my plan using the DVH and scrolling through the isodose lines. I noticed that I lost a great deal of coverage on my target volumes and the mean dose to my right parotid had increased slightly to where it was no longer meeting the desired objective. I returned to the “Optimization” tab and increased the dose penalties (weighting) for my target volumes and structures that were not meeting. I went back and forth between the “Optimization” tab and the “Fractionation” tab many times. I was still losing coverage on my target volumes.
I did many things to try and resolve these problems. I increased my modulation factor from 3.5 to 5, as was suggested by one of the dosimetrists, to decrease the change in coverage when calculating final dose. I greatly increased my dose penalties form 500 for my target volumes to 400000 and 600000 and increased the percentage to receive the prescribed dose to 99.6%. I even decreased the weighting on my rings as they might be pushing dose in too hard, resulting in decreased coverage. After trying these, I was still losing coverage. My last effort was to slightly increase the dose from the prescribed 70 Gy, 63 Gy, and 56 Gy to 70.1 Gy, 63.2 Gy, and 56.8 Gy, respectively. Once I did this, I was able to achieve target coverage.
My final dose, DVH, and ProKnow score sheet can be seen in figures 4 through 6. I encountered many issues while planning this case. I found it almost impossible to achieve both the conformality metric while still keeping the dose covering 0.03 cc of PTV70 below 71.3 Gy, which is only 101.86%. We typically try and keep the hot spot to 105% for our head and neck cases at my internship site. The overall hot spot for this plan was 73.32 Gy. From my experience, as conformality increases, so does the hotness of the plan. There were also metrics that I am not used to seeing, such as the volume of the PTV63-PTV70 covered by 66.15 to be less than 20%. To try and achieve this, I pushed harder on my maximum dose for my opt_PTV63, which decreased the percentage about 10%, but I still was not able to achieve 20%. The mandible presented a challenge because it is overlapping with the PTV70 so it was difficult to achieve the desired objective of 10% receiving 70 Gy. I pushed harder on my DVH point of 8% to 70 Gy, and although I was only able to achieve 12.358%, I did not want to sacrifice coverage of my target volume to achieve this. I spent over a week, intermittently working on this plan and I am not sure I would be able to improve my results, especially considering we are only allotted 3 days to complete a plan per our standard workflow at my site.
This plan was quite the challenge. I have planned multiple head and neck cases prior to this, but this one was more difficult, mainly because of the scoring metrics that ProKnow had designated. This was good experience as I was able to use all of the “tricks” I have learned since I began planning. I felt that this was a good example of having to find balance for achieving objectives within a plan. I had to accept slightly higher doses to certain structures to achieve desired target coverage.
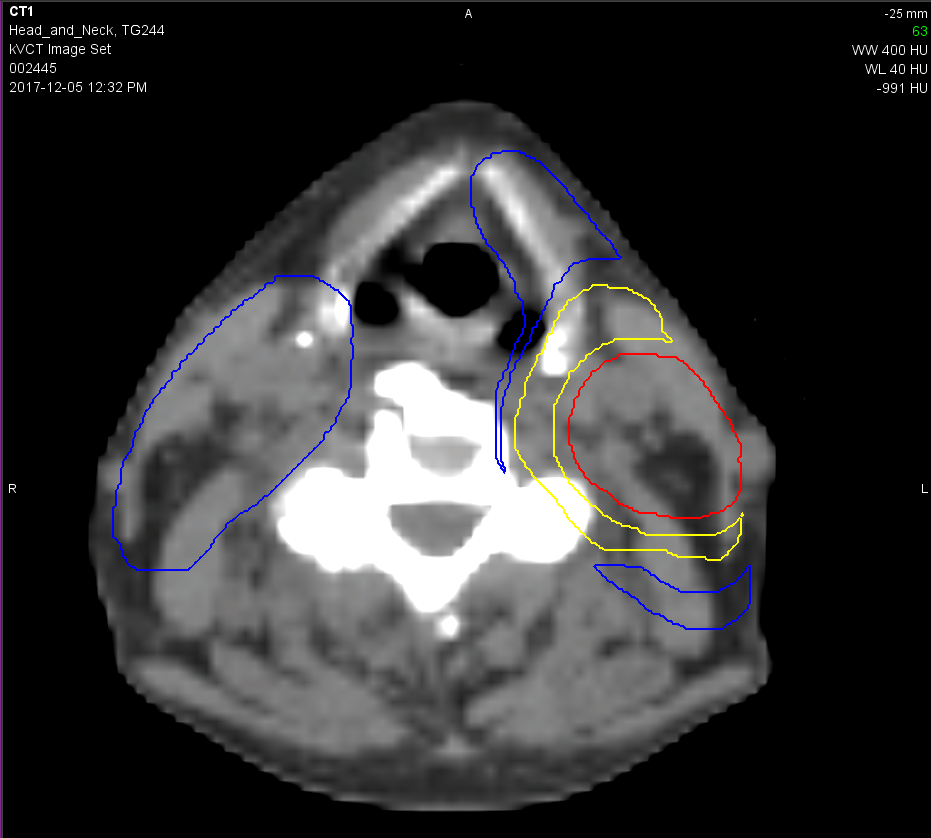
Figure 1. Visualization of PTV70 (seen in red), opt_PTV63 (seen in yellow), and opt_PTV56 (seen in blue).
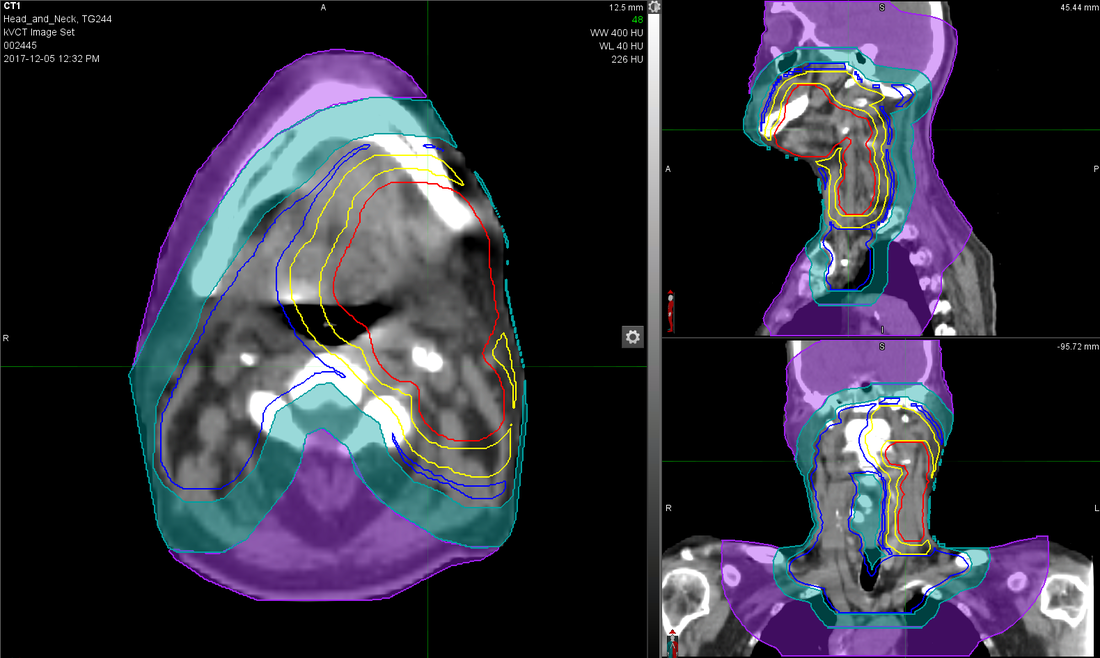
Figure 2. Visualization of the high dose ring (RingHD, seen in turquoise) and the low dose ring (Normal, seen in purple).
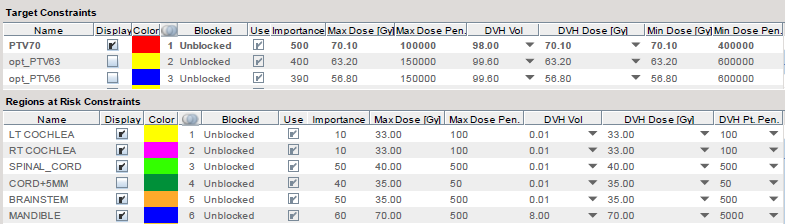
Figure 3. Optimization constraints for targets and surrounding structures.
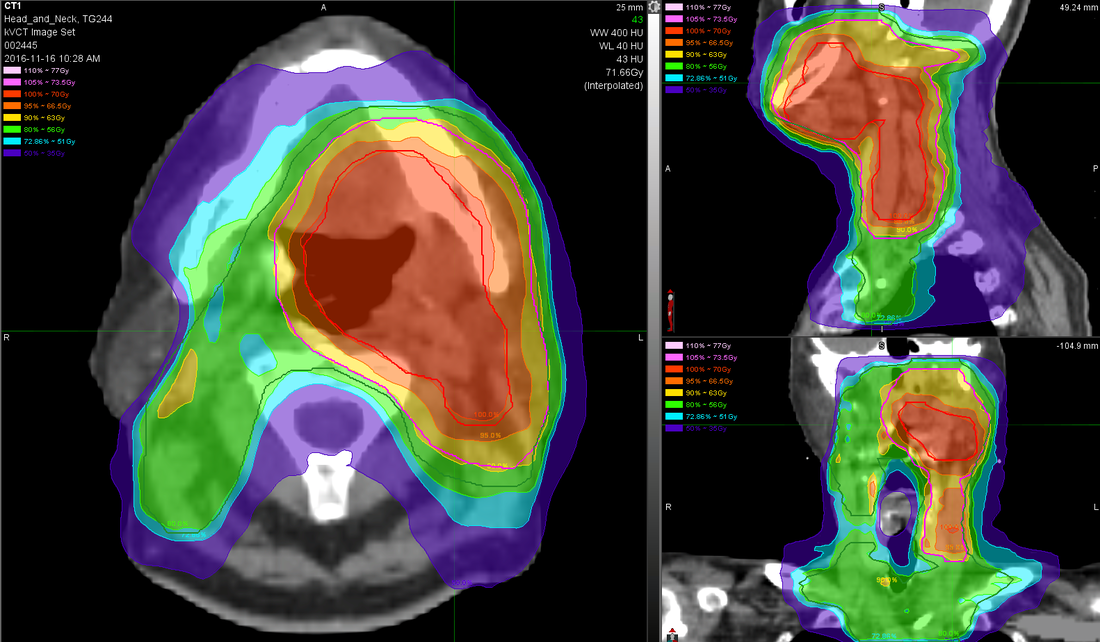
Figure 4. Visualization of the isodose lines in colorwash ( 70 Gy is red, 63 Gy is yellow, and 56 Gy is green).
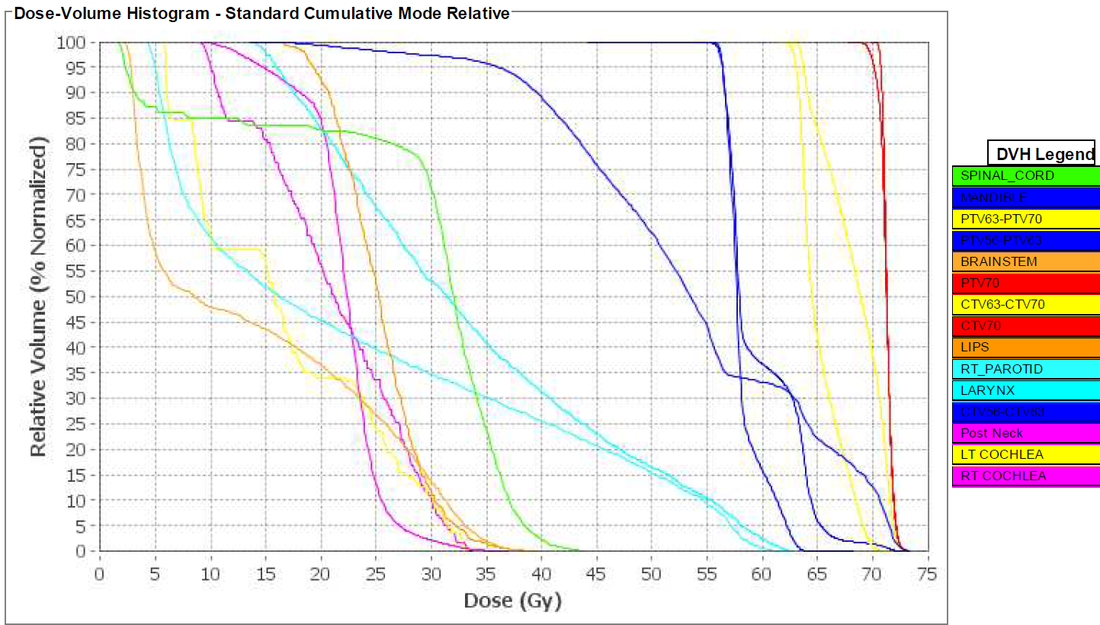
Figure 5. Visualization of the DVH.
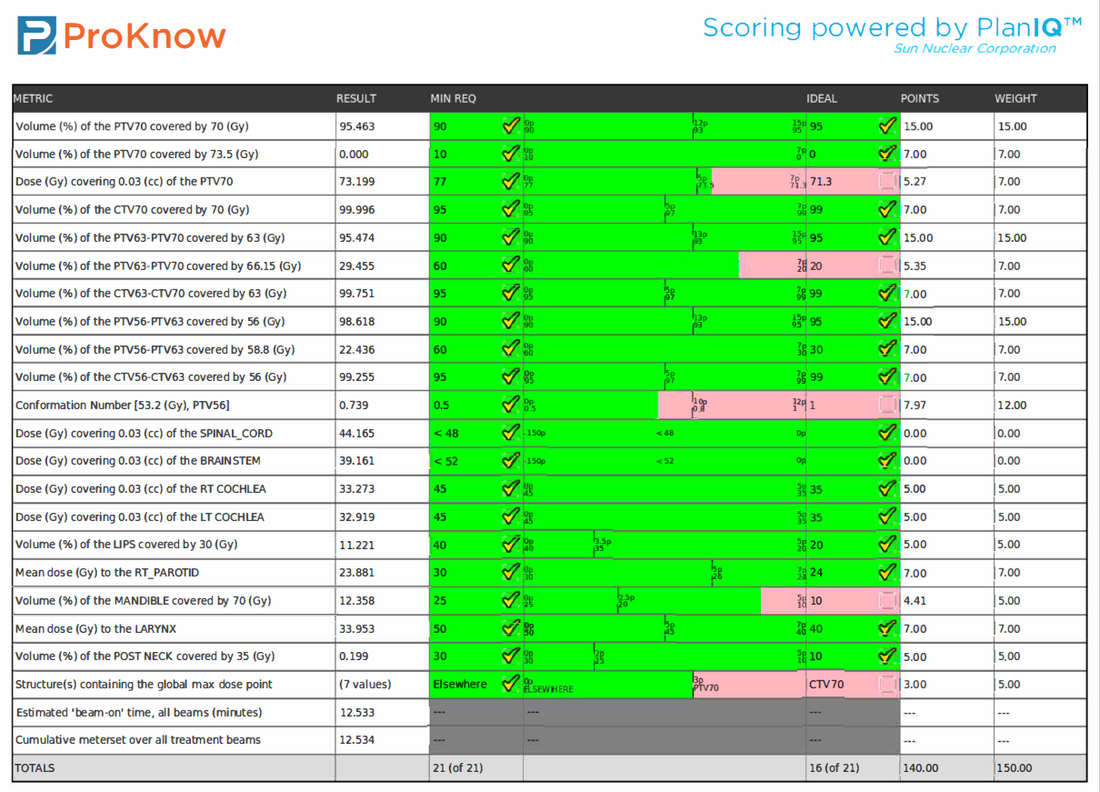
Figure 6. ProKnow score sheet with a score of 140 out of 150 achieved for this plan.
